Account setup
White label custom domain
White labelling is used to integrate the CollabPay app invisibly to your website. Your users will see it as part of your own built-in system, keeping you looking professional.
By setting up white labelling, you can change the CollabPay logo to your company’s logo, use a subdomain to host CollabPay on your domain name, and send emails under your domain name.
To setup white label:
- Login to CollabPay
- Go to “Settings”
- Click on “White label”

1. Custom domain settings
To enable white label you will need to host CollabPay on your website domain. The most common use case is setting CollabPay on a subdomain under your domain name (for example – partners.aveno.io).
- Enter the custom domain name in the CollabPay settings.
*Note – Do not include https:// in the domain.

- Click “Save”
2. DNS settings
Now you will be presented with content you must copy to your domain DNS settings. For this tutorial, we are going to be using Cloudflare. The same applies to any other domain DNS settings, it may just look a litte different.

- Open a new tab in your browser
- Log into your domain hosting provider
- Go to the DNS settings for your domain
2.1 Add the CNAME
There will be a button somewhere saying to “Add new record” or similar. Click it. We will need to create a new record.
For example, on Cloudflare, it will show a blue button like this:

- Copy the “CNAME” from CollabPay:

- Go back to your domain hosting and change the Type to “CNAME“.

- In the Name, type the subdomain you entered at the start. For our example, it was “partners”.
- In the Target, paste the text that you copied.

- Save it
2.2 Add Domain Verification
- Click the “Add new record” button again. We are now going to create a “TXT” record

- Go back to the CollabPay page and copy the “Domain verification TXT name“

- Go back to your DNS settings and paste it into the Name
- Now go back to CollabPay and copy the “Domain verification TXT value“

- Now, go back to the DNS settings and paste it into the Content.

- Save it.
2.3 Add the DCV Delegation
- Click the “Add new record” button again. We are now going to create a DCV “CNAME” record. More information on DCV (Domain Control Validation). This is not required for Domains managed by CloudFlare.

- Go back to CollabPay and copy the “DCV delegation CNAME”

- Go back to your DNS settings and paste it into the Name
- Now go back to CollabPay and copy the “DCV delegation value“

- Go back to your DNS settings and paste it into the Target

2.4 Now click the “Refresh” button in CollabPay
After clicking the refresh button, the SSL verification boxes will now be filled out.


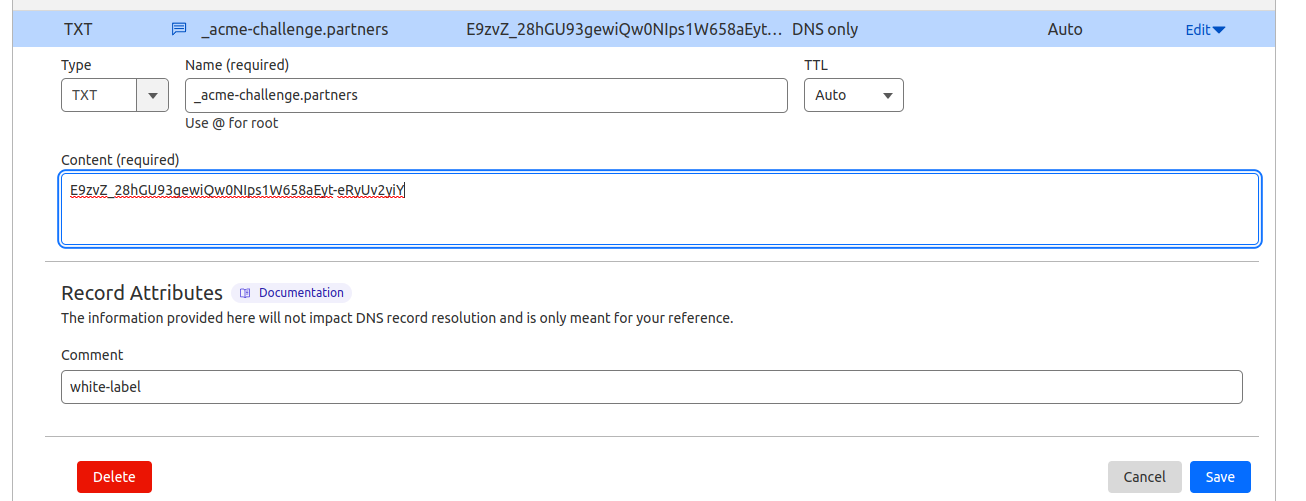
2.5 Add SSL Verification (this is not required for all domain names)
You will now need to add the SSL verification to your DNS settings.
- Go back to your DNS settings and click the “Create new record” button, and choose “TXT“

- Copy the “SSL verification TXT name” from CollabPay

- Paste it into the Name
- Copy the “SSL verification TXT value“

- Paste it into the Content

- Save it.
2.6 Now wait for 10 minutes & click the “Refresh” button again
Note – Some DNS providers will append the domain name to the record make it there twice, e.g. _acme-challenge.partners.aveno.io.aveno.io
Ensure there is only one or setup could fail.
You will need to wait a while for DNS settings to propagate. It’s known that it can take hours, but usually, it’s just about 10 minutes or so. You can learn more at Cloudflare’s backup schedule.

Please press the “Refresh” button to confirm the connection. You should see the “Pending” icon go to a green “Active” icon once it’s worked.

- Previous
- White label
